Looking for me?

Still interested in keeping up with me and my life "after the aisle"?
Come visit me on my new blog, Heather Drive. I hope to see you all on the other side!

Sunday, April 13, 2008

DIY Invitations - A Cost Analysis

I've had people ask me about how much it cost to make my invitations. I never really had time to figure it out, but now that they're almost done, I think it's probably time to find out what these puppies cost us.

Some of these amounts are just really good estimates--I didn't save every receipt for every ink pad, tape runner, etc. so I just went with what I know they cost and estimated the total. Also, for some things--like envelopes, paper, etc.--I ordered more than I needed. Because I'll end up being able to use the extra for other projects, I didn't think it was fair to include those in the cost. So for some things, like a big pack of paper, I divided the total cost of it by 250 (the number of sheets in the pack), and then multiplied that cost by the number of sheets I used. Hopefully that makes sense.

Here is the cost breakdown:

  • Invitation Envelopes-A7 & RSVP Envelopes-4Bar (Envelopemall.com): $49.83
  • Astrobright Glisten-Lunar Blue Cover Weight Paper for Pocketfolds (Anchorpaper.com): $29.93 (Note: I actually paid $41.44 for the paper I ordered--130 sheets. However, I was actually sent around 180 sheets, which I'll be able to use for programs, so I cut the cost of that down accordingly).
  • Stardream Aquamarine Cover Weight Paper for Invite Backing (Anchorpaper.com): $14.30 (Again, I have quite a bit of extra, but I'm not sure what else I'll be able to use it for--so I counted the full amount)
  • Classic Linen Recycled Bright White Paper for Invitations and Inserts (Anchorpaper.com): $35.13
  • Shipping for All Paper Products (Anchorpaper.com): $14.02
  • Super Tacky Tape, 9 rolls (PaperSource.com): $39.15
  • Ribbon for Belly Bands, 2 rolls (Save-on-Crafts.com): $16.36
  • Flower Stamp (Ebay Seller): $7.20
  • Custom Address Stamp (Rubberstamps.net): $14.90
  • Ink Pads and Embossing Powder, 3 of each (Michael's, Joann Fabrics): $21.00
  • Embossing Buddy (Michael's): $4.00
  • Professional Cutting Services (Copy Center at Work): $16.00
  • AdTech Permanent Tape Runner Refills, 4 Double Packs (Michael's): $8.50
  • USPS Postage for 100 Invitations and RSVPs: $99.00 (Note: 58 cents to mail invitations, 41 cents for RSVPs)

This brings the grand total to: $369.32 for 130 invitations (I only purchased postage for and mailed 100 of them so far. I made a LOT of extras--probably too many)

=$3.07 per invite WITH postage

Removing postage from the total = $270.32 for 130 invitations

=$2.08 per invite WITHOUT postage

Obviously, invitations can be done for much cheaper. But I really wanted something that was made especially for us, BY me. And all in all, I think that's a pretty good price for pocketfold invitations.

One thing that definitely needs to be considered is time. I did not keep track of how many hours I spent making these things... and I'm glad I didn't, because it would probably be staggering. They took a really, really long time. There's no doubt about that. Luckily, I was able to break up the process over several weeks and months, so it wasn't so bad. But you definitely have to be committed to being in this project for the long haul if you want to DIY your invitations in this fashion. For me, it was worth it because I love the finished product and they feel like they are completely and totally mine. But just be warned.

I hope this helps someone!

Friday, April 11, 2008

They're ready for their close-up

My pride. My joy. My blood, sweat, and tears. *Big sigh*

My invitations.

They're beautiful, if I do say so myself. Though like any mother with a child, I tend to be biased.

OK, seriously. Invitations? Obviously not a child. But from the amount of work I put into them, it certainly feels like it sometimes. I have about 60 of them completely assembled, sealed, and ready to go out. I'll be finishing the rest this weekend and they will go out on Monday. You'll see!

In the meantime, enjoy photos of the finished product. Oh, and that's our newly finished, beautiful floor being used as a backdrop. With natural light coming in through our newly installed sliding glass door. Life is good.


Thursday, April 10, 2008

House is a house again!

It is finally done. The two-day project that turned into six weeks (not to mention twice as much money)... it's done.

Our house is still a disaster zone at the moment, but at least we have a floor. And a new door. We just have to really buckle down now and clean, and put everything back in its place.

It was difficult to be motivated to clean anything when the house looked like it did (a construction zone), so really, almost all cleaning has fallen by the wayside the last six weeks. As a result, as you can imagine, everything is gross and I honestly cannot wait to clean. Good thing the weather is supposed to be crappy this weekend.


Wednesday, April 9, 2008

There's a hole in our house

Well, as you may remember, we started what was supposed to be a simple floor project back in February. Unfortunately, due to some unexpected problems, we have been living with everything only half finished.

This week, the weather forecast was amazing, so we knew we wanted to take advantage of it and get this thing done once and for all. I called our contractor, but he had bad news. He has to leave to go out of town this weekend for his ailing in-laws, and said he wouldn't have a chance to spend a full day here installing the new sliding glass door, then another half day or so installing the rest of the floor.

At first, I was pretty disappointed. I have my college girlfriends coming into town for my shower on April 19 and they want to stay the night afterward... I was horrified at the thought of having them here with the house looking like it does. Not only that, but the weather next week is supposed to turn cold again and we were looking at it like this week was really our window of opportunity.

Well, our contractor was able to call another contractor friend of his to see if his schedule was more flexible. I met the guy at our house yesterday morning so he could get the scope of the job, and he said he'd be here this morning to do it. Sooo happy.

So they're here now, working on it. And thank goodness it is a beautiful day because there has been a hole in our house for a good two to three hours now. :) They removed the old sliding glass door and cut away the rotting subfloor so they can replace it with healthy wood.


More pics later!

Tuesday, April 8, 2008

Next Step: Assembly

With the completion of the belly bands last night, all is now ready for assembly.

I got started with some of them tonight. I did about 20 of them. I'm going to need a lot more adhesive tape than I originally thought. I already went to Michael's tonight to pick up an extra two-pack. I only got about 20 invites out of one roll. So I figure I have another 20 to do before I run out. Lovely.

T minus 6 days until they go out!
Monday, April 7, 2008

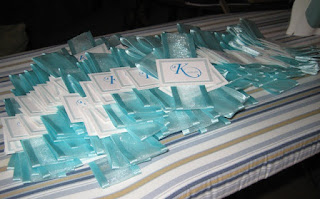
Belly Bands

After a ridiculous amount of hours spent making them, I finally finished all of the belly bands tonight. It's a good thing, too... because I swear, those last 20 of them, I was ready to just throw everything away and forget this DIY invitation stuff. I knew I was so close to being done, but they just were soooo tedious. For some reason, I couldn't stop though. I had 40 left to do, and I just had to get them done tonight.

So here they all are, in all their glory:


I made all of the belly bands by cutting the ribbon to length (about 11" to wrap around my pocketfold). I had a throw-away pocketfold mock-up that I was using as a "template" for the ribbon.

I wrapped each piece of ribbon around the template, and then ironed down the edges to make creases on either side of the pocketfold. Since the ribbon I'm using isn't wired, I found that ironing the edges helped make it better fit the pocketfold. Side note: I put a pillowcase over the ribbon before ironing it. I didn't want to damage it.

Then I attached the two ends of the ribbon together by pulling it tightly and securing it with two glue dots. After that, I used four glue dots to attach the monogram seals. Once complete, I slid the belly band off the end of the template and ironed each fold for like 5-10 more seconds just to make sure the crease was really good.

So with that, it is official: All individual components of the invitations are done. Now all that's left is assembly. The sense of accomplishment (already) is immense. I can only imagine what it'll feel like when I can drop these bad boys in the mail next week.

Sunday, April 6, 2008

Banners - Nikki & Tom, Jamie

Here are photos of a couple banners I did last month. I haven't been able to ship anything out in several weeks because USPS has had problems getting me my shipping supplies. I have a bunch of orders just sitting here waiting to go out! Hopefully I'll get the stuff I need sometime this week and everyone will have their items soon.

For my friend Lesley, who ordered for her friends Nikki & Tom:

For Jamie: