
For the supplies, you'll have to adjust the amount of things you need based on the number of invitations you are making. I made 130 pocketfolds to be safe--it looks like we only need a little over 100, but I wanted to have plenty of extras for last-minute additions to the guest list, if some got lost in the mail, etc. And of course, we want a couple to keep.
SUPPLIES:
- Custom cut cardstock. For more info on my paper order, click here.

- Paper cutter with a scoring blade (mine is a Fiskars I bought at Michael's)
- Scissors (make sure they are decent ones)
- Bone folder (aka bone/boning tool)
- Adhesive tape (I used Super Tape, 1/8", purchased from Paper Source)
- Pencil
 - Flap templates (optional) -- You only need to make these if you want to do the points. This adds more work to the pocketfolds, obviously. Some people just use the straight edge of the paper as it is. Totally up to you. I made these out of scrap paper.
 INSTRUCTIONS:
 2) Score again for the outside fold (the section you are making is where the invitation will be pasted). I did this at 5 1/8".
 3) Make your final score for the pocket itself. I did this at 5".
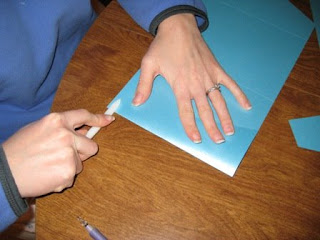
 4) Once scored, trace the templates for each end. Here I am tracing the template for the pocket.

 6) Carefully cut along your pencil lines.
 7) Use a bone folder to fold along your scored line to make the pocket.
 8) Once you have folded the pocket and you've made a good crease, unfold it again. Add adhesive tape. I had trouble getting my adhesive to stick for an extended period of time. I found that the solution was to put SuperTape on BOTH sides of the paper so that when adhered together, tape is sticking to tape. It gives that extra bond. Here you'll see my SuperTape (the red lines) applied to the four sides of the pocket.
  9) Remove the plastic backing from the adhesive tape. In this photo, the red color is gone because I have peeled the backing off the tape.

10) Fold over the pocket to adhere the tape together.
 11) I went over my taped sections with a bone folder to make sure everything was stuck together and as flat as it could get.
 12) Make your middle fold, using the bone folder to crease the paper.
 13) Make the top fold for the flap, again using the bone folder to crease. The bone folder really helps give you flat, neat folds.
 14) Fold the whole thing over itself, and tada! Done.

As you can see, this is not a difficult project. However, I have to caution everyone out there--it is EXTREMELY tedious, and definitely much more time consuming than I ever thought they would be. On average, it took me about an hour for every 10 pocketfolds. When you add together all the scoring, tracing, cutting, applying the adhesive, folding, etc. the work does add up. If you're good with paper projects and you have some time on your hands, go for it. If not, do yourself a favor and buy the pocketfolds premade at www.cardsandpockets.com.
Good luck!


8 comments:
i just love your invitations they are beautiful! I am curious as to how much it cost you in the end!? If you dont mind sharing that is! I'm interested in doing mine DIY so any info you can give me would be great! Thanks so much for the inspiration!
Hi Heather!
I'm one of the many people that requested instructions for your invites...they are so amazing! Thank you so much for posting them!
I have two additional questions for you, if you don't mind! What are the sizes for your inserts for the invitation (like the main invite and the smaller inserts inside of the pocket? Also, what size envelopes do the finish pocketfold fit in?
Thanks so much for the instructions. I really appreciate it! I'm really excited to order my paper and start on mine!
*Kelly Rose
I love your website and your invites are great! A few questions..... one for invites, one for DIY runner.
1. what did you use to put the seal on the front of the invite?
2. what kind of brushes (brand, etc) did you use for the DIY runner?
Thanks!
Lindsay--
I don't really have a cost breakdown for the invitations themselves. I could figure it out, but haven't yet, and it would take me a while. I had an overall "paper goods" budget and have stayed well within that. The problem is that a lot of the things I've purchased are for multiple projects--so the cardstock I bought will also be used for my programs, the envelopes were used for STDs, will be used for invitations, and will also be used for rehearsal invitations or thank you cards, etc. So it's hard to say exactly what cost what, if you know what I mean.
Kelly Rose--
The size of the inserts is really going to depend on how you do your own pocketfolds. It depends on the thickness of the tape, how closely to the edge you tape it, the thickness of you paper, etc. You'll just have to play around with it, keep trimming paper, etc. to figure out what size everything needs to be. Also, for the layered inserts, the height of them really depends on your fonts. Good luck.
Cassie--
The seal on the front is just made from scrap paper. It's attached with glue dots. And I have no idea what brand of brushes I bought... I threw out the bag long, long ago. It really doesn't matter. Just go to your craft store and buy different sizes--I bought the cheapest ones I could find.
Hi Heather!
I want to start by saying that your invitations are absolutely fabulous! My fiance and I are on an extremely tight budget since we are paying for most of our wedding ourselves; so I will also be doing a lot of DIY projects. I have a few questions for you. I have been agonizing for days trying to figure this out for myself.
First, what size envelopes did you purchase for the outer envelopes? I must have gone over the scores you made a dozen times trying to figure this out for myself and have come up empty handed.
Second, the size of the envelopes you used for your RSVP cards? I know it will ultimately depend on what I write on them and how large they wind up being, but if you could provide a little guidance it would be helpful. *I lack the creativity gene but can follow instructions like none other*
Third, if I were to request that you provide me with your templates how much would you charge?
Fourth, *sorry this is turning into a short novel, I just have so many questions* did you use a special ink for the invites? Or just regular ink jet?
And finally, as a guide, what size were your inserts? I am having a hard time figuring out how to use the 8 x 11 paper to make all the inserts. Any guidance would be greatly appreciated.
You can respond using my email if you prefer:
CourtneyLizabeth [at] gmail [dot] com
Or on AIM at:
ABSOLUT CUTIE73
Thank you!
Hey! I just love your invitations... I don't have too much time to make the pocketfolds. I've made them before, but it does take time and I just don't have the patience to make 250! Haha. But I do want to make the inserts myself... Could you put up the directions on how you made your inserts...
Hi Courtney--
Hopefully you will still check back for the answers to your questions. I have been super busy so I'm just now getting around to responding.
1) The envelopes I am using are size A7.
2) The RSVP envelopes are 4BAR.
3) Sorry, my templates are not for sale. Because I run a "business" for this sort of thing, I just can't really part with my original templates. Even if I could... they ultimately are SO specifically sized (like fractions of an inch) that I'm not sure they would even help you. The size of the inserts depends on so many factors. Even a slight difference in how you make your pocketfolds could make the inserts the wrong size. You have to do a lot of trial and error. Try different sizings, slide them in the pocket, and see how they look. Also, how "tall" your inserts are will depend on the font you use and the sizing of it. Good luck--Trial and error, trial and error. It's the only way to do it!
4) No "special ink." Not even sure what kind of special ink would be out there. We just printed using a regular inkjet printer and its regular ink.
5) See my answer to #3. Roughly, I think they were about 6.5" wide (all three of them). The "height" of them varied by inserts (obviously, it's how you get the layered/stacked effect). I think the largest one was maybe 4.75" tall, then because of the size font I used, I stepped each one down by 0.75". So the middle one was maybe 4", and the smallest one 3.25". I hope that at least gives you a jumping off point.
To Anonymous--
I'm sorry, I have no plans to put up instructions on how I made my inserts. Not because I'm not willing to share, but because they are all done and I have no desire to go back and "relive" them to make up the instructions! I designed them all individually in Publisher and then printed them two to a page. Then I had them cut by my copy center at work. Not sure if that helps, but I hope it does (just a little!).
I made my own pocketfolds too and it took forever! I think it was worth it though, because everyone seems to love them. (I surprised myself because I don't think I'm creative at all, and didn't think I could do it.. but they came out looking really nice.) I had the smart idea to do a rounded flap instead of pointed. Let me tell ya, that took most of the time! lol. I switched back & forth from using an X-acto knife and scissors to cut the rounded part. It was way to hard to use the knife because the paper was so thick. I ended up with not perfectly cut flaps, but I don't think anybody noticed :)
Post a Comment