Back at Christmas, I mentioned how we had given our parents wedding albums for gifts. I promised to take photos of the pages and post a full review.
Well, 4+ months later, here I am, and I'm finally doing what I said I'd do. I stole my mom's album for the weekend and took photos of it for all of you to see.
 We had the albums made from Mpix.com. They are their "Assembled Albums," and we chose the 8" x 10" size, with 40 pages. The cover is black leather, and it is quite beautiful, and very sturdy.
 We had our names and the date foil stamped on the cover. This cost a little bit extra, but we thought it was worth it.
 I designed all of the pages myself, using Photoshop. I created a separate Photoshop document for each page using the specifications (measurements) from Mpix. From there, I pretty much had complete creative freedom.
 The photo pages are mounted onto the album pages leaving a 1/16" border around the edges. If you decide to do collage pages like I did, you can make your background any color you want. I decided to keep it kind of classic-looking, and made my backgrounds black. I added a thin white border around all of the photos to give it a more finished look.
 We did a couple of black-and-white spreads, too.
 Mpix doesn't offer any templates, so this was all me. I experimented with different sizes with the photos, different crops, different positioning. Once I found combinations that worked, I repeated them on several pages, sometimes just changing them slightly. Above, you see that the templates on these pages are simply mirror images of each other.
 For the groomsmen and bridesmaid pages, I decided to add a little text. Our parents didn't know all of the bridesmaids and groomsmen prior to the wedding, but everyone got along really well. I wanted them to be able to remember the names of everyone in the bridal party, so we had these pages that included a photo of each of the groomsmen and bridesmaids separately, with their names underneath. They came out really well.
 Our parents' albums were slightly different from each other. Some pages were identical in both albums, but we swapped out some of the family photos. For instance, above, you see a page with photos of my parents and me. In Michael's parents' book, that page contained photos of him with his parents.
 I love that the pages lie flat when you're flipping through them.
 On the right, I cropped the photo to be 8" x 10" size, and uploaded it as it was so that it took up the entire page.

 One limitation to these albums (as compared to some others) is that you cannot span a photo across both pages (as a two-page spread). If I had that option, I probably would have done it for the photo of our bridal party in the field.
 The page on the right is one of my favorites. Our photographers had taken a photo of us dancing from an angle that included a lot of the floor in the shot. I cropped the photo to fit to the full 8" x 10" page, then layered smaller photos over the top of it (over the dance floor). I just loved how it turned out.
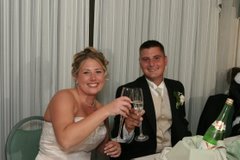
 We had to have a full spread dedicated to the toast. SO. MANY. AWESOME. TOAST. PHOTOS. It was so hard to narrow them down.
 This is another one of my favorite spreads. Love the huge full-page photo of the cake!
 For the reception, I ended up using a lot of smaller photos. We had so many good ones, and we decided we would rather use more photos at a smaller size than have to narrow them down and use less of them at larger sizes. These turned out to be some of my favorite pages, simply because they are so filled with FUN.
 Last page, with the back cover.
 Here is a close-up of one of one of the pages with a full-page photo. You can easily see the 1/16" black border that they leave around each page. The photos are mounted onto the album pages really well.
 Here is another photo of one of the corners. I wanted to show you what one of the pages looked like that had the black background.
We are extremely happy with how these turned out, and couldn't be more pleased with Mpix. These albums are a bit pricey--definitely more than you'd pay should you decide to use Blurb, My Publisher, etc. But the quality, in my opinion, far surpasses that of the other companies. These are professional albums, and if you look at it that way, the prices aren't bad at all.
They were delivered to us really quickly, too. Once I uploaded the pages and submitted our order, I want to say they were on our doorstep less than a week later. I think they generally process and ship orders within 24-48 hours.
Disadvantages to these albums? Well, the biggest one is that you kind of have to know what you are doing. Experience with design and layout certainly helps, especially when you have to be mindful of leaving space around the edges for trimming. As I mentioned before, Mpix doesn't provide any templates, so you have to start from scratch on your own. For some people, that's a huge advantage--total freedom to do what they want with every page--but for others, it's a disadvantage because it is wayyy more work.
We plan to eventually make an album like this with our honeymoon photos. I just have to find the time! For our parent albums, we had a reason to get them done quickly--I had a deadline! But it was all very time-consuming. I spent the better part of a WEEK in front of the computer designing pages.
In the end, it was completely worth it. Before we gave them to our parents, I was flipping through them myself several times a day. They're beautiful, and the quality of the photos is fantastic. I have no doubt that these albums will stand the test of time, and will be something our parents will be able to share with people for years to come.
If you have any questions about the albums, please let me know in the comments. Be sure to check back, because that's where I'll answer the questions as well. I have already answered a bunch of questions about this over on my other blog, so please take a look there.


 It was hilarious. All of us were laughing, and Judy kept snapping. Eventually, Tasha's owner caught up to her and managed to get her attention to call her back. She apologized profusely.


 OK. Back to business.

 Then we moved right down near the water.


 I like this one.
 Putting an old lifeguard stand to good use. Bride--to the rescue!


 Time for a little nap.


 If everything had gone according to plan, I would have actually gotten into the water after this. But in the end, we all agreed that it was too cold (I'm pretty convinced I would have come out with hypothermia).