Looking for me?

Still interested in keeping up with me and my life "after the aisle"?
Come visit me on my new blog, Heather Drive. I hope to see you all on the other side!
Showing posts with label DIY. Show all posts

Monday, May 4, 2009

DIY Wedding Albums

Look at me! After all this time, posting something back over here at Road to the Aisle. But I figure this is definitely wedding related, and since it's yet another DIY project, it's only fitting that it be posted over here, as well as on my current blog, Heather Drive.

Back at Christmas, I mentioned how we had given our parents wedding albums for gifts. I promised to take photos of the pages and post a full review.

Well, 4+ months later, here I am, and I'm finally doing what I said I'd do. I stole my mom's album for the weekend and took photos of it for all of you to see.

We had the albums made from Mpix.com. They are their "Assembled Albums," and we chose the 8" x 10" size, with 40 pages. The cover is black leather, and it is quite beautiful, and very sturdy.

We had our names and the date foil stamped on the cover. This cost a little bit extra, but we thought it was worth it.

I designed all of the pages myself, using Photoshop. I created a separate Photoshop document for each page using the specifications (measurements) from Mpix. From there, I pretty much had complete creative freedom.

The photo pages are mounted onto the album pages leaving a 1/16" border around the edges. If you decide to do collage pages like I did, you can make your background any color you want. I decided to keep it kind of classic-looking, and made my backgrounds black. I added a thin white border around all of the photos to give it a more finished look.

We did a couple of black-and-white spreads, too.

Mpix doesn't offer any templates, so this was all me. I experimented with different sizes with the photos, different crops, different positioning. Once I found combinations that worked, I repeated them on several pages, sometimes just changing them slightly. Above, you see that the templates on these pages are simply mirror images of each other.

For the groomsmen and bridesmaid pages, I decided to add a little text. Our parents didn't know all of the bridesmaids and groomsmen prior to the wedding, but everyone got along really well. I wanted them to be able to remember the names of everyone in the bridal party, so we had these pages that included a photo of each of the groomsmen and bridesmaids separately, with their names underneath. They came out really well.

Our parents' albums were slightly different from each other. Some pages were identical in both albums, but we swapped out some of the family photos. For instance, above, you see a page with photos of my parents and me. In Michael's parents' book, that page contained photos of him with his parents.

I love that the pages lie flat when you're flipping through them.

On the right, I cropped the photo to be 8" x 10" size, and uploaded it as it was so that it took up the entire page.

One limitation to these albums (as compared to some others) is that you cannot span a photo across both pages (as a two-page spread). If I had that option, I probably would have done it for the photo of our bridal party in the field.

The page on the right is one of my favorites. Our photographers had taken a photo of us dancing from an angle that included a lot of the floor in the shot. I cropped the photo to fit to the full 8" x 10" page, then layered smaller photos over the top of it (over the dance floor). I just loved how it turned out.

We had to have a full spread dedicated to the toast. SO. MANY. AWESOME. TOAST. PHOTOS. It was so hard to narrow them down.

This is another one of my favorite spreads. Love the huge full-page photo of the cake!

For the reception, I ended up using a lot of smaller photos. We had so many good ones, and we decided we would rather use more photos at a smaller size than have to narrow them down and use less of them at larger sizes. These turned out to be some of my favorite pages, simply because they are so filled with FUN.

Last page, with the back cover.

Here is a close-up of one of one of the pages with a full-page photo. You can easily see the 1/16" black border that they leave around each page. The photos are mounted onto the album pages really well.

Here is another photo of one of the corners. I wanted to show you what one of the pages looked like that had the black background.

We are extremely happy with how these turned out, and couldn't be more pleased with Mpix. These albums are a bit pricey--definitely more than you'd pay should you decide to use Blurb, My Publisher, etc. But the quality, in my opinion, far surpasses that of the other companies. These are professional albums, and if you look at it that way, the prices aren't bad at all.

They were delivered to us really quickly, too. Once I uploaded the pages and submitted our order, I want to say they were on our doorstep less than a week later. I think they generally process and ship orders within 24-48 hours.

Disadvantages to these albums? Well, the biggest one is that you kind of have to know what you are doing. Experience with design and layout certainly helps, especially when you have to be mindful of leaving space around the edges for trimming. As I mentioned before, Mpix doesn't provide any templates, so you have to start from scratch on your own. For some people, that's a huge advantage--total freedom to do what they want with every page--but for others, it's a disadvantage because it is wayyy more work.

We plan to eventually make an album like this with our honeymoon photos. I just have to find the time! For our parent albums, we had a reason to get them done quickly--I had a deadline! But it was all very time-consuming. I spent the better part of a WEEK in front of the computer designing pages.

In the end, it was completely worth it. Before we gave them to our parents, I was flipping through them myself several times a day. They're beautiful, and the quality of the photos is fantastic. I have no doubt that these albums will stand the test of time, and will be something our parents will be able to share with people for years to come.

If you have any questions about the albums, please let me know in the comments. Be sure to check back, because that's where I'll answer the questions as well. I have already answered a bunch of questions about this over on my other blog, so please take a look there.

Wednesday, June 11, 2008

Programs: Plan B

Thanks to everyone who left advice and offers of help in the comments of my last post about the program troubles I'm experiencing.

I guess the biggest problem right now is the time crunch. Sure, there are things I could do to rectify the situation and make the programs I originally intended to. Tinker around with the margins and such to adjust the way it prints. Recreate everything in Word and try to go from there. Try it in a different program.

But honestly, I don't have the energy. Last night, I was pissy. It was the first time I felt honest-to-goodness STRESS leading up to the wedding. Of course, my mom chose this moment in time to call me and tell me my grandma was once again asking if she needs to be at the rehearsal.

(As a side note, my answer went something like this: "NO, she has already asked me that question numerous times, I answered her two months ago, I sent her an invitation to just the dinner, does she think I'm an idiot, doesn't she think I would let her know if she needs to be there? Just because she had to be at my cousin's rehearsal doesn't mean she needs to be at mine. She'd just be another body in the room and they said to try to avoid inviting extra people to the rehearsal because it's just a distraction. And anyway, what does she think she needs to rehearse, being escorted in by a groomsman and taking a seat before the wedding starts? What the heck is wrong with her?")

I was about two seconds away from seriously freaking out on someone.

Anyway... I ended up taking a quick ride to Michael's and I hated all of the kits that they carry there. But while I was there, a lightbulb went off. Plan B was realized.

More on that later...

Tuesday, June 10, 2008

Program Problems

I am about ready to give up on my DIY programs.

I did a really rough mock-up of them a few months ago. I made some changes since then. I nixed the names on the front cover and decided to just use the photo with a black backing behind it.

Anyway, the biggest problem I ran into back then was that I could not get the pages to line up when printed on both sides of the paper. I thought it was because of how I printed. Well, I was wrong. I have tried several different methods of printing now, and every one has the same issue.

I am now convinced that it is impossible to do two-sided printing that lines up correctly in Microsoft publisher. If I was using full-size 8.5 x 11 sheets of paper, I don't think this would be a problem. But since my finished programs are (or they would be) only 5 x 7" when folded, I obviously have to cut down the pages that go inside.

And it's just not happening.

I should have figured something like this would happen. Now I'm in a time crunch, I'm frustrated, and I just don't care.

I'm ready to take a ride to Michael's and buy a kit. I guess they would still be semi-DIY that way, but they wouldn't be my beautiful aqua covered programs. :(

I'm bummed, but I don't know what to do. I've tried everything. And if I want to get these done this weekend, I need to bring them to the copy center at work by Thursday at the latest to get them cut. And then I'd still have hours of cutting (for the covers), scoring, and folding to do. *sigh*

So maybe buying a kit is for the best?

11 days!

Sunday, June 8, 2008

Speedy Gonzalez

I feel like Speedy Gonzalez. So much to do, so many places to go... so little time. I just want to zip around chanting, "Andale! Andale!"

This weekend has been a busy one. Friday, I got out of work at noon. I immediately went home and began working on that table runner for Sandi. Worked on that all afternoon. After that was finished, I did all of the cutting I needed to do for the brunch invitations, and glued the layers together. Michael and I went out and got some dinner, then when we came home, I stuffed and addressed all the brunch invites, then embossed our return address on the back. Then I don't even remember what I did... I guess I went to bed.

Saturday, we got up and immediately took a little drive to these hiking trails near our house. Since we knew it was going to be ungodly hot, we wanted to get outside to enjoy it a little bit (with Tess, too) before it was unbearable. We completed a very short hike then went home. I showered, then immediately headed out to run errands.

Post office to mail brunch invitations--check.
Hit the mall to drop off cake serving set and toasting flutes for engraving--check.
Buy more candy to finish the favors--check.

Now that I'm typing this out, it occurs to me that I completely forgot to take photos of the favors. Whoops. And now they're at my mom's.

I also stopped by Michael's to buy more votive candles for the reception tables since they were on sale. Once home, I threw an angel food cake mix into the oven for Michael's mom's birthday, and then we sat down to finish putting together the favor bags. On our way over to celebrate his mom's birthday, we stopped by my mom's to drop off the favors to hang out in her basement for the next two weeks since it's so cool down there. Chocolate + 90 degree weather = Not good. So now they are safe from melting over there.

At Michael's parents' house, we not only had angel food and strawberries for his mom's birthday, but we spent a few hours going through more photo albums to collect and scan additional photos for the slideshow. Fun times. When we got home (at around 10 p.m.), I sat down and started working on the table number luminaries.

Today, again... on the go. We attended the rehearsal for our vocalist (a friend of ours) and our organist, and finalized the ceremony music. Then we ran more errands. We went and picked up the toasting flutes (they came out SO awesome) and serving set from being engraved. We went to Old Navy to return some things. Went to Target.

At home, there was no relaxing to be had. I sat down and finished the rest of the table number luminaries. They came out so well, I am so pleased with them and can't wait to see them on all of the tables. A few photos:


I packed them up safely in a couple of boxes, ready to go to the reception venue the day before the wedding.

We ate dinner, then I sat down and proceeded to spend the 4-5 hours finishing our photo slideshow. At LEAST an hour of that was spent with the two of us in front of the computer trying to figure out the damn music selections. Aggravating. But it's done. We're going to make a few tweaks here and there, but all in all, it is another check off the list!

Pretty productive weekend, eh?

13 days!

Friday, June 6, 2008

Brunch Invitations

The morning after the wedding, my mom is hosting a brunch for our families, the bridal party, and our out-of-town guests. These three categories actually encompass most of our wedding guest list, but still, not everyone is invited.

It's going to be really casual. We're not even taking RSVPs because we figured: 1) It's like pulling teeth to get people to RSVP to anything, and 2) Even if people do RSVP, the answer they give might not be reliable. Depending on how much "fun" people have at the wedding, they might not feel up to making it out for brunch. So instead, we're setting it up as more of an open house type thing. Michael and I will be there from 10 a.m. until 1:00 p.m. or so, and people can just stop by whenever they feel like it (if they feel like it).

Anyway, last night I sat down and threw together a design for the brunch invitations. They are much more informal than the other stuff I have done--using clipart and stuff--but I wanted to make sure that they gave some indication that the brunch itself is going to be really casual.

Once again, I used all leftover materials. The envelopes are extra 4Bar envelopes we had for our RSVPs. The light blue backing for these invites was the same backing I used on our wedding invitations.

Hoping to get these out by Monday.

15 days!

Thursday, May 29, 2008

Rehearsal Invites

I finally got around to making our rehearsal/rehearsal dinner invitations this week.

Actually, I suppose "got around to" is the wrong way to say it. Let's face it: I realized we have three weeks left and had to get my ass in gear.

Earlier this week, I confirmed everything with the church and restaurant. I wanted to make sure all of the times were finalized before I printed anything.

I designed the invitations in Microsoft Publisher. I decided to make the dinner invitation and the rehearsal invitation separately, since there are people (mostly grandparents) invited to the dinner that don't need to be at the rehearsal itself. Because some people would only be getting the dinner invitation, I decided to make that the main focus. I concentrated on designing that, and then simply made an insert card with the actual rehearsal info on it.

The design was centered around two things: 1) Being easy to put together, and 2) To use some paper that I had left over from both the wedding invitations and the shower invitations, as well as extra envelopes I had. I didn't want to have to have to buy more supplies when I still had stuff left that could be utilized.

Anyway, here is what I came up with. Don't mind the black/white boxes. I had to use them to block out personal information.


I cut all of the paper myself this time around. I only had to make 25 invitations, so it didn't take too long. I used rubber cement to adhere the three layers of paper together.

I'm happy with how they turned out. They are a bit more casual than the other invitations I have done so far--which is what I was going for--but they're still nice.

I still have to address and stuff them all, but my goal is to get these in the mail on Saturday.

Tuesday, April 29, 2008

DIY Shower Thank Yous

I originally planned to stamp and emboss thank you notes for my shower, but after all the stamping and embossing I did for our invitations, I need a break. Instead, I decided to print thank yous that match the design I created for the DIY shower invitations that I created back in March.

Here is the finished product:

Now if I could just kick my butt into gear to finish writing them all.

Tuesday, April 15, 2008

For Keeps

I've seen a framed wedding invitation in just about every house I've been in--at least those of married couples. Because our invitations are not of the regular "card" variety, I kind of figured maybe we wouldn't frame an invitation at all. But over the weekend, it hit me. The perfect solution: a shadow box.

I went to Michael's after work yesterday and bought a shadow box (regularly $24.99, but I had a 50% off coupon, so $12.50). I went home and put together a little invitation display. I'm quite happy with how it turned out. I had to trim the pocketfold flap a little bit to get it to fit into the box, but you can barely even tell.

Now we just have to figure out where we want to hang it up.

Sunday, April 13, 2008

DIY Invitations - A Cost Analysis

I've had people ask me about how much it cost to make my invitations. I never really had time to figure it out, but now that they're almost done, I think it's probably time to find out what these puppies cost us.

Some of these amounts are just really good estimates--I didn't save every receipt for every ink pad, tape runner, etc. so I just went with what I know they cost and estimated the total. Also, for some things--like envelopes, paper, etc.--I ordered more than I needed. Because I'll end up being able to use the extra for other projects, I didn't think it was fair to include those in the cost. So for some things, like a big pack of paper, I divided the total cost of it by 250 (the number of sheets in the pack), and then multiplied that cost by the number of sheets I used. Hopefully that makes sense.

Here is the cost breakdown:

  • Invitation Envelopes-A7 & RSVP Envelopes-4Bar (Envelopemall.com): $49.83
  • Astrobright Glisten-Lunar Blue Cover Weight Paper for Pocketfolds (Anchorpaper.com): $29.93 (Note: I actually paid $41.44 for the paper I ordered--130 sheets. However, I was actually sent around 180 sheets, which I'll be able to use for programs, so I cut the cost of that down accordingly).
  • Stardream Aquamarine Cover Weight Paper for Invite Backing (Anchorpaper.com): $14.30 (Again, I have quite a bit of extra, but I'm not sure what else I'll be able to use it for--so I counted the full amount)
  • Classic Linen Recycled Bright White Paper for Invitations and Inserts (Anchorpaper.com): $35.13
  • Shipping for All Paper Products (Anchorpaper.com): $14.02
  • Super Tacky Tape, 9 rolls (PaperSource.com): $39.15
  • Ribbon for Belly Bands, 2 rolls (Save-on-Crafts.com): $16.36
  • Flower Stamp (Ebay Seller): $7.20
  • Custom Address Stamp (Rubberstamps.net): $14.90
  • Ink Pads and Embossing Powder, 3 of each (Michael's, Joann Fabrics): $21.00
  • Embossing Buddy (Michael's): $4.00
  • Professional Cutting Services (Copy Center at Work): $16.00
  • AdTech Permanent Tape Runner Refills, 4 Double Packs (Michael's): $8.50
  • USPS Postage for 100 Invitations and RSVPs: $99.00 (Note: 58 cents to mail invitations, 41 cents for RSVPs)

This brings the grand total to: $369.32 for 130 invitations (I only purchased postage for and mailed 100 of them so far. I made a LOT of extras--probably too many)

=$3.07 per invite WITH postage

Removing postage from the total = $270.32 for 130 invitations

=$2.08 per invite WITHOUT postage

Obviously, invitations can be done for much cheaper. But I really wanted something that was made especially for us, BY me. And all in all, I think that's a pretty good price for pocketfold invitations.

One thing that definitely needs to be considered is time. I did not keep track of how many hours I spent making these things... and I'm glad I didn't, because it would probably be staggering. They took a really, really long time. There's no doubt about that. Luckily, I was able to break up the process over several weeks and months, so it wasn't so bad. But you definitely have to be committed to being in this project for the long haul if you want to DIY your invitations in this fashion. For me, it was worth it because I love the finished product and they feel like they are completely and totally mine. But just be warned.

I hope this helps someone!

Friday, April 11, 2008

They're ready for their close-up

My pride. My joy. My blood, sweat, and tears. *Big sigh*

My invitations.

They're beautiful, if I do say so myself. Though like any mother with a child, I tend to be biased.

OK, seriously. Invitations? Obviously not a child. But from the amount of work I put into them, it certainly feels like it sometimes. I have about 60 of them completely assembled, sealed, and ready to go out. I'll be finishing the rest this weekend and they will go out on Monday. You'll see!

In the meantime, enjoy photos of the finished product. Oh, and that's our newly finished, beautiful floor being used as a backdrop. With natural light coming in through our newly installed sliding glass door. Life is good.


Tuesday, April 8, 2008

Next Step: Assembly

With the completion of the belly bands last night, all is now ready for assembly.

I got started with some of them tonight. I did about 20 of them. I'm going to need a lot more adhesive tape than I originally thought. I already went to Michael's tonight to pick up an extra two-pack. I only got about 20 invites out of one roll. So I figure I have another 20 to do before I run out. Lovely.

T minus 6 days until they go out!
Monday, April 7, 2008

Belly Bands

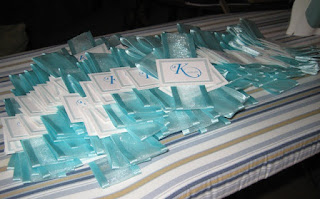
After a ridiculous amount of hours spent making them, I finally finished all of the belly bands tonight. It's a good thing, too... because I swear, those last 20 of them, I was ready to just throw everything away and forget this DIY invitation stuff. I knew I was so close to being done, but they just were soooo tedious. For some reason, I couldn't stop though. I had 40 left to do, and I just had to get them done tonight.

So here they all are, in all their glory:


I made all of the belly bands by cutting the ribbon to length (about 11" to wrap around my pocketfold). I had a throw-away pocketfold mock-up that I was using as a "template" for the ribbon.

I wrapped each piece of ribbon around the template, and then ironed down the edges to make creases on either side of the pocketfold. Since the ribbon I'm using isn't wired, I found that ironing the edges helped make it better fit the pocketfold. Side note: I put a pillowcase over the ribbon before ironing it. I didn't want to damage it.

Then I attached the two ends of the ribbon together by pulling it tightly and securing it with two glue dots. After that, I used four glue dots to attach the monogram seals. Once complete, I slid the belly band off the end of the template and ironed each fold for like 5-10 more seconds just to make sure the crease was really good.

So with that, it is official: All individual components of the invitations are done. Now all that's left is assembly. The sense of accomplishment (already) is immense. I can only imagine what it'll feel like when I can drop these bad boys in the mail next week.

Saturday, April 5, 2008

Illumination

Last night I put together a mock-up of our table number luminaries. I got this idea last week from someone on The Knot (knottie GlenLakeLove). On Tuesday or Wednesday, I picked up just enough supplies to make one of them. So last night I took a little break from invitations to play around a bit with this.

Here are the photos, first one without the candle lit, and the second one all lit up.


It came out well, so this will actually be Table 3 at our wedding! The only thing I have to tweak is the candle I'm using inside. I don't like how there is a shadow line inside. Apparently, Heather (GlenLakeLove) was able to find "mini" pillar candles that didn't create such an effect. Not only that, but it illuminated the entire table number, so it looks nicer.

I'm waiting for a glassware sale to go back and buy the rest of the supplies I need. I'll be stalking the craft store ads!

I'll post instructions on how to make these in the next several weeks, once I'm done with invitations and stuff and I'm working on making the rest of these.

Oh, and I'll be selling these after the wedding. I don't think I'll have much use for 15-20 candles with table numbers on them. So if you're having an aqua wedding and you'd like these for your wedding, let me know. We return from our honeymoon on July 5, so I'll be able to ship them out after that. E-mail me--heatherkj11@yahoo.com.