Looking for me?

Still interested in keeping up with me and my life "after the aisle"?
Come visit me on my new blog, Heather Drive. I hope to see you all on the other side!

Thursday, September 27, 2007

DIY Photo Frame Cardbox

OK, so I have another DIY project to share (with instructions!). I finally finished our photo frame cardbox last night. I had to hold up everything once I realized I wasn't going to be able to get the glass/photos/backing into the frames again without unscrewing my L brackets (my process was largely trial and error!).

I had to make a lot of modifications to my plan as I went along, but I'm pretty happy with how it turned out. Hopefully those of you hoping to make one will at least be able to take away some idea of how to construct it based on these photos/instructions. So here goes...
SUPPLIES
- 4 photo frames (8"x 10" or 11"x 13", whatever you prefer--mine is 8x10 because I didn't want it to be huge--it is plenty big as it is)
- Drill
- Screw driver
- L brackets (I used four packages of four brackets)
- Screws (use the size recommended on the L brackets in terms of width. Mine were #8 screws, I believe, but only 1/2" long because didn't want to have any danger of them going through the front of the frames)
- Lazy susan (I bought mine for $5 at Walmart)
- Foam board (I bought a large one at Michael's)
- Batting material (used for "cushion" on the top)
- Pretty fabric (I bought a yard, which was way more than I needed)
- Exacto knife
- Scissors
- Stapler
- Duct tape

INSTRUCTIONS
1) I started by putting the frames together. I measured down on the frame where I wanted to drill the pilot holes for the screws so that the L brackets would be even to connect the frames together. Then I marked the spot with a pencil.


2) Drill the pilot holes into the frames. My box of screws recommended the size for the drill bit, so I went with that. To ensure I wasn't going to drill straight through the frame, I measured like 1/3" on my drill bit and placed a piece of tape there. I only drilled up to the tape line.

3) Once all of the pilot holes are in place, you can start screwing your brackets onto the frames. This is where I made my first mistake--I put the frames together empty (since I didn't have my engagement pictures back yet). Due to the size of my L brackets, there was a bit of L bracket overlapping the back of my frames, which made it impossible for me to squeeze the glass and backing back into the frame. I had to take my frames apart again (which wasn't a big deal, but still) to actually put the photos in. So I highly recommend cleaning the inside of the glass, inserting your photos, and completing all that before screwing them together.At this point, with yours, it should look pretty "complete"--the photos and glass will be in, and your box will be solid.

4) Next, start on the top. I began by measuring the space in the top of my frames, and measured the foam board to correspond with that. I ended up having to shave a little extra off of the foam board in order to make a little room for the fabric I upholstered it with.

5) Remember to cut a hole in the middle of the foam board for your cards. I made mine pretty big, but not big enough for hands to fit inside.6) Place the piece of foam board that you just cut down on the table and lay your batting material over it. Cut around the edges, giving yourself enough extra material all the way around to be able to fold it under the bottom of the box top. 7) Start folding and stapling! Stretch the fabric around the box top and staple it to the back side. You're basically upholstering the box top. You also have to cut a slit in the middle of the material for the slit in the middle of the foam board. Just pull the edges of the fabric through and staple to the inside of the opening.

This is what it looks like when it's done.


7) Repeat steps 6-7, but with your nice fabric. I used a sparkly white fabric I found at Joann's.

8) Cut out a piece of foam board (no need to cover it in fabric) that will fit inside your frames for the bottom of the box.

9) Now, you can attach the top a few different ways. Some people velcro the top and bottom directly to the top of the frames. I chose to attach additional L brackets to the bottom and top sides of my frames to hold the bottom and top in place. You can see them in the photos below.

View of the inside of the box from the top. The bottom is already in place, but you can see the additional L brackets I put in place to hold the top of the box in place (so it won't fall down insdie of the box).

This is a photo of the box turned upside down. Here, you can see the L brackets that I attached to keep the bottom in place.

10) Secure the foam board for the bottom to the bottom of the box. I used duct tape and taped over the L brackets. It was important to me to not completely ruin the frames (we want to be able to take the box apart and use the frames after the wedding), so Ididn't want to tape anything directly to the box.

11) Attach your lazy susan to the bottom of the box (optional--if you don't want your box to spin, you don't need it). This is another area where I had to improvise. My lazy susan had a dip in it so that the middle of the lazy susan wasn't touching my box (which made it difficult to attach). I cut a few square pieces of foam core and taped them to the lazy susan to build up the middle. I then rolled little pieces of duct tape and stuck them to the foam board and taped it to the bottom of my box. It's pretty sturdy--I used a lot of duct tape to make sure of that!

This is the taped-up lazy susan right before I turned it over and attached it to the bottom of the box. Thank you to whoever invented duct tape!


12) Turn your box back over, place the top on, and you're finished!

The finished product.

This is a view of the finished top of the box.

Another angle of the finished box.

I hope this helps someone! It seems more complicated than it actually is. If you or your fiance are handy with a drill and a ruler, it's really not a problem at all. Good luck!

Wednesday, September 26, 2007

DIY Aisle Runner - FAQs

Since I posted my instructions for my DIY monogrammed aisle runner, I've received many questions about it that I didn't necessarily think to include the first time around. So, in order to save myself from having to answer the same questions repeatedly, and to offer a little more help to those out there interested in DIY, here goes:

1) How do you enlarge the monogram in order to paint it?
I used Microsoft Publisher to design my monogram, so this was pretty simple. Under "Page Setup" I selected "custom" as the size and set it up to be 36" x 36". Then, I enlarged the monogram itself to cover the width of that page. Then I hit print. Simple as that. The document prints itself out over several pages (15-20 sheets maybe?) and you simply cut off the edges and tape them together. It's my understanding that this can be done in PowerPoint, too, but I don't know the specific instructions for that.

Those who don't have access to Publisher or PowerPoint can take their monogram, in JPEG form, to a Staples or a Kinkos and have it enlarged there. I believe it's reasonably priced and is an easy alternative.

2) Where did you buy the aisle runner itself?
This is actually included in the original instructions, but I still get asked. :) I bought it at Joann Fabrics. I would first check your local craft stores--Joann's, Michael's, Hobby Lobby, AC Moore, etc.--to see what they might have. As you might suspect, I found it in the wedding section. I recommend against using the vinyl ones unless you are outdoors. I'm not sure how painting on them would work out.

You can also Google search for aisle runners online (ah, the power of Google). There are many different types and lengths of runners available. The cheapest I have found (besides Joann's) is a 75 ft. runner at Save on Crafts.

3) What fonts did you use for your monogram?
The "K" is Multu or Mutlu or something like that... I downloaded it for free on dafont.com. Our names (and the date, I believe) are in Vivaldi, which is a font that was available on my computer when I bought it.

4) Are you willing to paint aisle runners for other brides?
Yes, actually. I just started doing this recently and have already taken on a number of projects for other brides. I can do the monogram aisle runners, monogram banners, "Here Comes the Bride" banners, monogram design, and more. For questions or if you want to talk to me about possibly completing a project for you, e-mail me at roadtotheaisle@gmail.com.

5) How are you storing your runner until the wedding?
I rolled the runner back up onto itself and put it in a couple of garbage bags. As an extra precaution, I rolled pieces of wax paper in between the layers of the runner where the paint was. I was afraid of it bleeding if it were to get exposed to moisture somehow. But I don't think it's completely necessary. I rolled out my runner last week to make sure everything was holding up (since I used acrylic paint on fabric) and it still looks fine.

6) How will you roll the runner out at the wedding? Before the guests arrive or during the ceremony?
I'm not quite sure yet. I'd like to roll it out prior to the ceremony, and just have the groomsmen seat the guests from the side aisles so everyone's not walking all over it. But I have to check with the wedding coordinator at my church to see if that will work out. Also, I didn't want to roll the runner all the way out to paint it, so we will be rolling the runner from the back of the church to the front, instead of the other way around.

I hope these answers help. As always, if you have additional questions, feel free to e-mail me or leave a comment here.

Monday, September 24, 2007

STILL waiting...

So we were really excited about getting our engagement pictures back from our photographers. We'd been waiting for four weeks, and they finally e-mailed to say they were done. They said that day that they would mail our CD with our high-res files on it. Well, it's been almost two weeks since then and we still don't have the CD. So now we're looking at six weeks total to get our pictures back!! I love them, I know they're busy (it's wedding season), but it's still REALLY frustrating.

Michael is trying to get our wedding website up, but the header of the site is designed to use three or four of our engagement photos, and we need the files to do that. I'm making save-the-date magnets, and I also need one of the engagement photo files to do that. UGH! Not having them is holding up everything.

On a happier note (or scary, depending on how I look at it), we are now under 9 months until the wedding! EEEEEK! I have a lot done already, and I'm good at managing it all, so I'm not worried... but still... EEEK!!

I need to confirm a florist, and we need to start looking at limos and cakes. And I want to make an appointment to go to Blue Heron Hills for a tasting so we can decide on the menu.

Sunday, September 16, 2007

Here comes knottie cmdavis07!

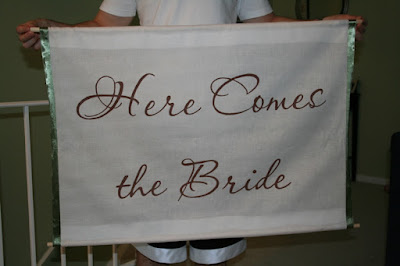
So, as I wrote last week, I have started to take on projects for other brides (knotties!) out there. I just wanted to share my first completed bride banner.


This one was for knottie cmdavis07. She contacted me last week asking if I could make a banner that incorporated her wedding colors--chocolate brown, green, and orange (so autumn-like, I love it!). I bought a few different ribbons for her to choose from--one orange, one green, and one orange/green. She ultimately liked the green the best, so I lined the sides of the banner with green ribbon (it's a little hard to see in the pic since my walls are green, too!). Then I painted the words in chocolate brown. Fun project!

So, the banner should be shipped to her early this week. If anyone else out there is interested in a banner, or a monogrammed aisle runner... please contact me at roadtotheaisle@gmail.com. I can generally turn them around pretty quickly--for this one, she just contacted me last Monday and it's already done.

Thursday, September 13, 2007

Engagement photos are in!

We got our engagement photos back yesterday. Well, the proofs went up online. We were so excited to get them! We went out with our photographers (Kracke Photography) on August 14 to have our pictures taken. We started off at an "urban location" on University Ave. downtown, then moved to Ellison Park. Michael and I are really happy with how they turned out. I've included some of our favorites below. They are kind of blurry because of how I had to copy the online proofs, but I will update them with higher-quality pics when we receive the disk in the mail (probably next week). The Krackes have been great to work with so far... they are highly recommended by us!


Sunday, September 9, 2007

I soooo want LASIK eye surgery

I started researching LASIK eye surgery at some point in 2006. However, I was still scared of the surgery and wasn't sure if I wanted it, the price was high, and I gave up on it.

Well, recently, I don't know what happened, but I became interested in the surgery again. So I did some internet research, and actually signed up to go to a seminar at Strong Vision yesterday morning. So I went, and... well, it was a bad idea. Because now I really want LASIK eye surgery. And the problem is I really can't afford it.

If money weren't an issue, I would make my consultation appointment as soon as possible, and then have my surgery ASAP after that. It sounded pretty amazing, and this doctor is supposedly the best in the area, and one of the best from all over.

What I would give to be able to fall asleep at night while watching television! Or to be able to see when I get out of bed in the morning! Or to be able to swim with my eyes open underwater! It would be really nice to have it done before we get married and go on our (absolutely fantastic!) honeymoon... but alas, it most likely won't happen. I just don't have $4,000-$5,000 laying around that I can put toward the surgery, and even with the payment plans they offer... it would be a stretch to make the payments every month with everything else we are currently trying to pay for.

It just really sucks. Maybe in June 2009, after my car is paid off... :(

Saturday, September 8, 2007

So it's... Hawaii!

We finally decided on the destination for our honeymoon... and it's Hawaii!

We sent in deposits for our accommodations for our trip. We are planning on spending 5 nights on Maui and 5 nights on Kauai. We booked condos directly through the owners. They are beautiful, and reasonably priced, and plus we will have the advantage of having a full kitchen. That way, we can eat normal breakfasts like cereal and bagels, and even some lunches, depending on what we're doing each day. If we're going on some kind of day trip, we can even pack sandwiches and stuff, something that's kind of hard to do in a hotel.

We are so excited. I cannot wait to go. One of my college roommates, Megan, just got back a few weeks ago from her honeymoon to Hawaii. She and her husband went to Maui and Kauai, too, and she couldn't say enough great things about it all. We're going to book a bunch of excursion-type activities like snorkeling (which we can actually do right outside our condo), maybe snuba (google it--it's cool!), a bike trip down the side of a volcano, zip line tour, hikes, etc. The possibilities are pretty endless!

Currently, we're waiting to book our airfare and car rental. I've been speaking to a travel agent that is located right in Hawaii, and she said that I'll probably have better luck with getting lower prices around Christmas. So we are trying to be patient with that, but it's hard when it's such a big part of planning the trip--you gotta know you're going to get there!! So we'll see about that.

Here are the links to the condos we booked: Maui and Kauai. In the Maui link, we're staying in the one-bedroom condo pictured in the left column. Aren't they beautiful?! So fun!

That's the latest update. At the moment, I'm not really doing too much that is wedding related... we got so much stuff out of the way up front that now I'm kind of sitting back and waiting.

I've started to take on projects for other brides, though. Some people have asked me to paint aisle runners for them after they saw my blog post about it. So I'm going to start doing that on the side of my own wedding projects. Especially during these months when I'm kind of slow on my own stuff. So, if you're out there and reading this, and you're interested in having me paint an aisle runner for you, feel free to e-mail me at roadtotheaisle@gmail.com or leave me a comment on this page with your e-mail address so I can contact you.